Last Updated on 13.03.2026 by DriverNew
 HP LaserJet 1018 / 1018s is an old but reliable laser printer. The main issue is that on Windows 11 and Windows 10, installing this printer does not always work automatically. Sometimes Windows cannot find the driver. Sometimes the driver installs, but the printer does not print.
This guide shows how to properly install the HP LaserJet 1018 / 1018s driver on Windows 11, Windows 10, Windows 8.1, Windows 8, and Windows 7.
Which driver you need for HP LaserJet 1018 / 1018s
For HP LaserJet 1018 / 1018s, the official HP driver from the older installation package is usually used.
This package also works for the following models: 1018 / 1020 / 1022 / 1022n / 1022nw.
This is important because these models often have the same installation issues. That is why many of the tips in this article also apply to other printers in this series.
Before you start the installation
Before installing the driver, do a few simple things.
- Download the HP LaserJet 1018 / 1018s driver from the official HP page:
https://support.hp.com/us-en/drivers/hp-laserjet-1020-printer-series/439423 - If the page opens but the file does not download, you can use the direct link to the installer file:
https://ftp.hp.com/pub/softlib/software13/COL51473/bi-124608-2/hp_LJ1020_Full_Solution-v2012_918_1_57980.exe - Make sure you have the printer USB cable ready.
It is better to connect the printer directly to the computer instead of using a USB hub. This reduces the risk of installation errors.
How to install the HP LaserJet 1018 / 1018s driver
There are two main installation methods:
If you use installation through Setup.exe, do not connect the printer in advance. Connect it only when the installer tells you to do so on the screen.
If you use manual installation through the INF file, it is better to connect the printer to the computer and turn it on in advance. This helps Windows create the required USB port, usually USB001, which you will need to select during installation.
For Windows 7, Windows 8, and Windows 8.1, the standard installation is usually the better option.
For Windows 10 and Windows 11, manual installation is often more reliable.
Method 1. Standard driver installation using Setup
This is the first method you should try. It is mainly suitable for Windows 7, Windows 8, and Windows 8.1. In some cases, it also works on Windows 10.
Step 1. Run the installer
Run the Setup.exe file as administrator.
To do this, right-click the file and select Run as administrator.
Step 2. Follow the on-screen instructions
Usually, the installer will show you what to do next.
Very important: do not connect the printer in advance if the installer has not asked you to do it yet.
Step 3. Connect the printer and complete the installation
When the installer asks you to connect the device, connect the HP LaserJet 1018 to the computer via USB and turn it on. After the installation finishes, open the list of printers, find HP LaserJet 1018, and print a test page.
If the test page prints, the driver was installed correctly.
Method 2. Manual HP LaserJet 1018 driver installation
If the standard installation does not work, use this method. It is especially useful for Windows 10 and Windows 11.
Manual installation helps if:
- Windows cannot find the driver automatically;
- the printer is not detected;
- the device appears as an unknown device;
Setup.exedoes not start or does not finish the installation;- the printer does not print after a standard installation.
Step 1. Extract the driver to a separate folder
How to get the INF file from the EXE.
- Install 7-Zip or WinRAR if it is not already installed.
- Right-click the EXE file → 7-Zip/WinRAR → Extract.
You should now have a folder with the driver files. Inside it, find the HPLJ1020.inf file.
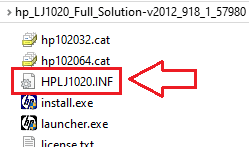
This is the file used for manual installation.
If file extensions are not shown in the folder and you cannot find HPLJ1020.inf, look for a file named HPLJ1020. It is the same file. Windows may simply have file extensions hidden.
Step 2. Open the printers section
On Windows 11 and Windows 10, open:
Start → Settings → Bluetooth & devices → Printers & scanners
On Windows 7, Windows 8, and Windows 8.1, you can open:
Control Panel → Devices and Printers
Step 3. Add a new printer
Click Add a printer.
If Windows does not find HP LaserJet 1018 automatically, choose the option to add the printer manually. The exact wording may differ depending on the Windows version. Usually it is one of these options:
- The printer that I want isn’t listed;
- My printer isn’t listed.
Step 4. Choose manual installation
Select this option:
Add a local printer or network printer with manual settings
Then click Next.
Step 5. Select the printer port
For a USB printer, you usually need to select this port:
USB001 (Virtual printer port for USB)
If there are several USB ports in the list, try USB001 first.
If that port is not available, make sure the printer is connected to the computer and turned on, then open the port list again.
Step 6. Click “Have Disk”
In the manufacturer and printer model window, click Have Disk.
Step 7. Browse to the INF file
Click Browse and select the path to the HPLJ1020.inf file in the extracted driver folder.
Then click OK.
Step 8. Select HP LaserJet 1018
In the list of models, select HP LaserJet 1018 and click Next.
Step 9. Complete the installation
Windows will install the driver and add the printer to the system.
If Windows asks which option to choose, you can usually keep the current installation option. If the printer worked incorrectly before, it is better to remove the old driver and reinstall it.
Step 10. Print a test page
After installation, open the printer properties and print a test page.
If the page prints, the installation was successful.
This video shows how to manually install a driver using “Have Disk…”
How to install HP LaserJet 1018 on Windows 11
Windows 11 is the version that most often causes problems with installing this printer. The main reason is that this model is not usually offered with a separate new driver in the usual format.
If you have Windows 11, it is better to use this order:
- download the driver;
- extract the files;
- do not wait for Windows to find the printer automatically;
- go straight to manual installation;
- select
HPLJ1020.inf; - install the printer through the
USB001port.
On Windows 11, it is better not to rely on automatic installation. If the printer does not appear right away, switch to manual installation through HPLJ1020.inf.
How to install HP LaserJet 1018 on Windows 10
On Windows 10, you can first try the standard installation through Setup. If that does not help, move to manual installation through the INF file.
On Windows 10, these situations are common:
- the printer does not appear in the list;
- Windows sees the device, but does not recognize it as a printer;
- the driver installs, but printing does not work.
In these cases, manual installation is almost always better than automatic installation.
How to install HP LaserJet 1018 on Windows 8.1, Windows 8, and Windows 7
On these Windows versions, installation is usually easier.
In most cases, it is enough to:
- download the official driver;
- run
Setup.exe; - connect the printer when the installer asks you to;
- complete the installation;
- print a test page.
If the standard installation does not help, use the manual method through HPLJ1020.inf.
What to do if HP LaserJet 1018 does not install
Below are the most common problems and simple ways to fix them.
Problem 1. The computer does not see the printer
If Windows does not detect HP LaserJet 1018, do this:
- Check whether the printer is turned on.
- Check the USB cable.
- Connect the printer to a different USB port.
- Do not use a USB hub.
- Restart the computer.
- Try manual driver installation.
Sometimes the problem is not the driver, but the cable or the USB port.
Problem 2. The printer appears as an unknown device
Sometimes Windows detects the device, but shows it as an unknown device.
In this case:
- open Device Manager;
- find the unknown device;
- right-click it;
- select Update driver;
- choose the option to browse for a driver on this computer;
- select the folder where
HPLJ1020.infis located.
After that, Windows may identify the printer correctly.
Problem 3. The driver installed, but the printer does not print
If HP LaserJet 1018 appears in the printer list but does not print, check the following:
- Whether the correct port is selected. Usually it should be
USB001. - Whether there is a stuck print queue.
- Whether an old or incorrect driver is installed.
- Whether the printer was previously connected to a different USB port.
What you can do:
- remove the printer;
- restart the computer;
- install the printer again;
- select
USB001again during installation; - try a different USB port.
Problem 4. The HP installer does not start
If Setup.exe does not start:
- right-click the file;
- select Run as administrator;
- if that does not help, try extracting the package manually;
- perform manual installation through the INF file.
In many cases, manual installation works even when the standard installer does not.
Problem 5. After installing Windows 11 or Windows 10 updates, the printer stopped working
This sometimes happens after a system update.
What to do:
- remove the printer from the device list;
- remove the old driver if it is still installed;
- restart the computer;
- install the driver manually again;
- print a test page.
How to remove the old driver before reinstalling
If HP LaserJet 1018 was installed before and is no longer working, the old driver may interfere with the new installation.
Do this:
- open the printer list;
- remove HP LaserJet 1018;
- open Print Server Properties or Print Management, if that section is available;
- remove the old HP LaserJet 1018 driver;
- restart the computer;
- install the driver again.
If the printer still does not work after installing the driver, remove the old driver and install it again. You can find detailed instructions in the article How to fix problems that cause your printer or scanner to stop working.
How to know the driver was installed correctly
After installation, check these three simple things:
- HP LaserJet 1018 appears in the list of printers.
- The printer does not show an error icon.
- The test page prints without errors.
If all of this works, the driver is installed correctly.
Frequently asked questions
Can you install HP LaserJet 1018 on Windows 11?
Yes, you can. But sometimes the standard installation does not help. In that case, it is better to install the driver manually through the INF file.
Can you install HP LaserJet 1018 on Windows 10?
Yes. On Windows 10, this printer often works, but manual installation is sometimes required.
Which installation method is better?
For Windows 7, Windows 8, and Windows 8.1, the standard installation through Setup is usually suitable. For Windows 10 and Windows 11, manual installation through HPLJ1020.inf is often more reliable.
Do you need to connect the printer before installation?
If you use the standard Setup.exe installer, it is better not to connect the printer in advance. Connect it only when the installer asks you to do so.
If you use manual installation through the INF file, it is better to connect the printer and turn it on in advance so that Windows creates the required USB port.
Where is the HPLJ1020.inf file located?
It is located in the extracted driver folder. If Windows hides file extensions, you may see the file simply as HPLJ1020.
Summary
HP LaserJet 1018 can be installed even on modern versions of Windows. If the standard installation does not work, that does not mean the printer is faulty. In most cases, manual installation through the INF file helps.
The simplest order is this:
- download the driver;
- extract it;
- try the standard installation;
- if that does not help, install the driver manually through
HPLJ1020.inf; - print a test page.
If you follow the steps one by one, HP LaserJet 1018 can usually be made to work even on Windows 11 and Windows 10.


Thank you.