Last Updated on 24.07.2025 by DriverNew
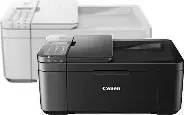
 Drivers for printer and scanner: Canon PIXMA TR4751i. On this page of the website you will be able to download all the necessary drivers and software for this printer.
On the official Canon website for the Canon PIXMA TR4751i printer, you can download several different files that contain drivers and software. We recommend downloading and installing the drivers contained in the “MP Driver” file. This file contains drivers for the printer and scanner, as well as software for the scanner: “IJ Scan Utility.” Installing these drivers will not cause any problems. After installing these drivers, you will be able to use all the functions of your printer and scanner.
You can download the file containing all the necessary drivers and software for Canon PIXMA TR4751i printer on this page of the website. The file will be downloaded from the official Canon website.
Software for Windows operating systems
Download drivers and software for Windows MP Driver – TR4751i This drivers and software for operating systems: Windows 11, Windows 10 (64-bit), Windows 10 (32-bit), Windows 8.1 (64-bit), Windows 8.1 (32-bit), Windows 7 (64-bit), Windows 7 (32-bit) |
Software for MAC operating systems AirPrint Canon PIXMA TR4751i For Mac operating system, you do not need to download and install printer and scanner drivers. You can use the “AirPrint” software that is built into the Mac operating system. With this software, you can print and scan over a wireless LAN (WLAN). |
How to install drivers for printer and scanner: Canon PIXMA TR4751i. Do not connect the printer to the computer. Start installing the software first. During the installation process, a message will appear on the monitor informing you when to connect the printer to your computer.
This video shows how to install drivers for the Canon PIXMA TR4751i printer, and at what stage to connect the printer to your computer.
Installing drivers for printer and scanner: Canon PIXMA TR4751i. Double-click the downloaded file. It will be extracted from the archive and the driver installation will begin. Follow the instructions on the monitor screen to install the software and make the necessary settings.
How to fix problems that make your printer or scanner not work: Canon PIXMA TR4751i.
If you have installed the drivers for Canon PIXMA TR4751i but the printer or scanner does not work or stopped working after updating your Windows operating system, then follow the steps below to solve the problem. Completely uninstall the drivers and other software that was installed along with those drivers. After that, be sure to restart your computer and install the new drivers. Read more about how to properly install and uninstall printer and scanner drivers: read here.
Canon PIXMA TR4751i
How to scan documents and photos
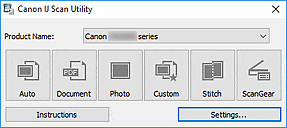
The ‘IJ Scan Utility’ is software for conveniently scanning photographs, documents, etc. In the Windows operating system, click the ‘Start’ button to find the shortcut for the ‘IJ Scan Utility’ software. You can then use your computer mouse to drag this shortcut to your desktop.
 If you find it difficult to understand the settings of this software, then I offer you the easiest way to scan any documents and photos. To do this, use one button ‘Photo’. By clicking on this button, you can scan any documents and photos. The scanned document will be saved to your computer. The quality of the scanned documents is good, so you do not need to change the software settings. Many users of this software use one ‘Photo’ button to scan documents or photos. If you need to change the location where the scanned image will be saved or change other scanner settings, then use the “Settings” button for this.
Canon PIXMA TR4751i
How to scan using the software built into the Windows operating system.
You can use “Windows Fax and Scan” software to scan documents and photos. This software is included in the operating systems: Windows 11, Windows 10, Windows 8, Windows 7, Windows Vista. You can access this software through the Start menu in every version of the Windows operating system. You can read more about this here.
To use this software, be sure to install the scanner driver.


Leave a Reply