Last Updated on 25.03.2026 by DriverNew
 This guide explains how to install the HP LaserJet P2035n printer driver in Windows 11, Windows 10, Windows 8.1, Windows 8, and Windows 7. This model differs from the HP LaserJet P2035 because it supports network connectivity, so this article covers both USB installation and network installation separately.
Where to Download the Driver
Download the driver from the official HP website
- Download the file (ljP2035-gdi-pnp-win64-en.exe) for Windows 11, 10, 8.1, 8, 7, Vista, and XP (64-bit)
- Download the file (ljP2035-gdi-pnp-win32-en.exe) for Windows 10, 8.1, 8, 7, Vista, and XP (32-bit)
Important: On the official HP page, Windows 11 is not listed as a separate supported operating system for this model. However, you can still use this package as the latest available HP driver if automatic installation through Windows did not work.
Which File to Choose
If you have 64-bit Windows, download ljP2035-gdi-pnp-win64-en.exe. If you have 32-bit Windows, download ljP2035-gdi-pnp-win32-en.exe.
Before You Begin
- Download the correct driver file.
- Decide in advance how you want to connect the printer: via USB or over the network.
- If you plan to install the driver using the EXE file, do not connect the USB cable in advance.
- If the printer was installed before, remove the old device entry from Windows.
Installing HP LaserJet P2035n via USB
If the printer is connected by USB, use the standard installation method.
- Download the correct driver file.
- Run it as administrator.
- Connect the USB cable only when the installer asks you to do so.
- Wait for the installation to finish.
- Check whether the printer appears in the Windows device list.
Installing HP LaserJet P2035n over the Network
For the network version of this printer, this step is especially important. The older HP package is more often intended for a standard local installation, so for network connections, the built-in Windows tools are often more convenient and reliable.
- Connect the printer to the network and make sure it is powered on.
- Find the printer’s IP address on your local network.
- Open Settings > Printers & scanners or Devices and Printers, depending on your Windows version.
- Click Add a printer.
- If Windows does not find the device automatically, choose the option to add the printer manually.
- Add the printer by IP address or as a network printer.
- If Windows asks for a driver, use the HP driver from the downloaded package or update the driver list through Windows Update.
Tip: If you run the HP EXE file first and then want to install the printer specifically as a network printer, it is usually more convenient to prepare the driver first and then add the printer manually through Windows.
Installation in Windows 11
In Windows 11, the HP LaserJet P2035n network printer may not install successfully on the first try. In practice, the built-in Windows tools usually work best: adding the device, installing driver updates, and manually adding the printer by IP address.
- First, try installing the driver using the HP EXE file.
- After that, open Settings > Bluetooth & devices > Printers & scanners.
- Click Add device.
- If the printer is not found, choose the manual add option.
- For a network connection, enter the printer’s IP address.
- After installation, check Windows Update and Optional updates.
If the printer is installed but does not print, remove it, restart your computer, and add it again. If necessary, use manual driver installation from the extracted HP package.
Manual installation helps if:
- Windows does not find the driver automatically;
- the printer is not detected;
- the device appears as an unknown device;
Setup.exedoes not start or does not finish the installation;- the printer does not print after a standard installation.
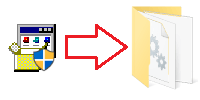
Extract the Driver to a Separate Folder
How to get the INF file from the EXE.
- Install 7-Zip or WinRAR if it is not already installed.
- Right-click the EXE file and choose 7-Zip/WinRAR > Extract.
You should now have a folder with the driver files. Inside it, find the file HP2030.INF.
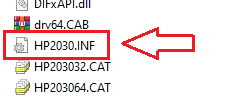
This is the file used for manual installation.
If file name extensions are hidden and you cannot find HP2030.INF, look for a file named HP2030. It is the same file. Windows may simply be set to hide file name extensions.
This video shows how to manually install a driver using “Have Disk…”
Installation in Windows 10
In Windows 10, this printer usually installs more easily than in Windows 11. For a USB connection, the standard EXE installer is often enough. For a network connection, it is usually more convenient to add the printer through Windows.
- Download the correct driver file.
- For USB installation, run the EXE file and connect the cable only when the installer prompts you.
- For network installation, open the Add Printer wizard and add the device over the network or by IP address.
- If Windows does not find the driver automatically, update the driver list through Windows Update.
Installation in Windows 8.1
In Windows 8.1, the built-in Windows driver often works better for this printer series. This is especially convenient for the P2035n network model.
- Connect the printer to the network or directly to the computer.
- Open Devices and Printers.
- Click Add a printer.
- If necessary, run Windows Update in the installation wizard.
- Select HP LaserJet P2035n from the list and finish the installation.
If the HP EXE file did not help, it is better not to repeat the same installation steps multiple times in Windows 8.1. Instead, switch directly to the built-in Windows driver.
Installation in Windows 8
In Windows 8, the older HP package usually works for this model. For USB connections, you can use the standard installer. For network connections, use manual printer setup if needed.
- Download the correct version of the driver.
- For USB, do not connect the cable in advance.
- Run the EXE file.
- Connect the USB cable only when the installer prompts you.
- For network installation, use the Windows Add Printer wizard.
Installation in Windows 7
In Windows 7, the HP LaserJet P2035n usually installs without major problems, especially over USB. For network use, you can also use the Windows wizard and add the printer manually.
- Download the correct version of the driver.
- For USB, run the installer and connect the cable only when prompted.
- For network setup, open Devices and Printers and add the printer manually.
- Make sure the printer appears in the list and prints a test page.
What to Do If HP LaserJet P2035n Does Not Install
- Make sure you downloaded the correct version: 32-bit or 64-bit.
- If you are installing the printer via USB, do not connect the cable in advance.
- If you are installing the printer over the network, check the IP address and make sure the device is reachable on the network.
- Remove the old printer entry before reinstalling.
- Try adding the printer through Windows.
- If necessary, use manual driver installation from the extracted HP package.
Summary
For the HP LaserJet P2035n, the driver and the basic installation steps are the same as for the HP LaserJet P2035. However, for the P2035n version, you must take the connection type into account. If the printer is connected via USB, the standard EXE installer is usually enough. If the printer is connected over the network, it is more convenient and reliable to add it through the built-in Windows tools, especially in Windows 11 and Windows 8.1.


Leave a Reply