Last Updated on 24.01.2025 by DriverNew
![]() Drivers and software for operating systems Windows 11, Windows 10, Windows 8, Windows 8.1, Windows 7, Windows Vista (64-bit / 32-bit)
Drivers and software for operating systems Windows 11, Windows 10, Windows 8, Windows 8.1, Windows 7, Windows Vista (64-bit / 32-bit)
Printer Model: Canon PIXMA Pro9000
How to install the printer driver correctly: Do not connect the printer to the computer. Start installing the software first. During the installation process, a message will appear on the monitor informing you when to connect the printer to your computer.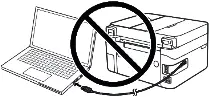 If you see the message ‘Found New Hardware’ on the screen, click Cancel and disconnect the USB cable. Then proceed to install the software. A common mistake when installing a driver is that you first connect the device to your computer using a USB cable and then install the driver. In this case, the operating system detects the connected device and installs its own driver, which may not work correctly or not work at all. However, some other devices may work fine with the driver installed by the operating system. Therefore, if there is a driver specially created for your device, then first start installing this driver and only then connect the device to the computer. If you installed the driver incorrectly, uninstall the driver, restart your computer, and reinstall the software. Be sure to restart your computer after installing and after uninstalling the drivers.
![]()
Software for Windows operating systems
![]()
Download drivers and software for Windows (64-bit)
Download drivers and software for Windows (32-bit)
Canon PIXMA Pro9000 Printer Driver
Full Driver and Software Package (Windows)
This file is a driver for Canon IJ multifunction printers. This file will download and install the drivers, application or manual you need to set up the full functionality of your product.
Double-click the downloaded .exe file. It will be decompressed and the Setup screen will be displayed. Follow the instructions to install the software and perform the necessary settings.
 Canon PIXMA Pro9000
The manufacturer of the Printer Canon Pixma Pro9000 created drivers only for the following operating systems: Windows 8.1, Windows 8, Windows 7, Windows Vista. Drivers and software for other operating systems were not created. These drivers are compatible with Windows 11 and Windows 10 operating systems. Therefore, you can use these drivers for installation in operating systems: Windows 11 and Windows 10.
If your printer and scanner were working fine but stopped working after updating your Windows operating system, uninstall the previously installed driver and reinstall it. Be sure to restart your computer after installing and uninstalling the drivers.
How to uninstall drivers in Windows 10 operating system
Disconnect the USB cable that connects the printer to your computer. In your Windows operating system, click on Start, Settings, and then Applications. In the list of installed programs, locate and left-click your printer or scanner driver and click “Uninstall” and then click “Uninstall” again. Click “Yes” to confirm the software removal and follow the instructions on the monitor screen. In the same way, uninstall all drivers and software with the name of your printer and scanner. After that, restart your computer.
This video shows you how to uninstall drivers for your printer and scanner.


Leave a Reply