Last Updated on 14.04.2026 by DriverNew
Many Samsung printers have problems installing Samsung Universal Print Driver 3 on Windows 10 and Windows 11. It usually looks like this: the driver seems to install, but the printer does not print, does not appear in the system, is detected incorrectly, or works with errors.
This guide is intended primarily for the situation where Samsung Universal Print Driver 3 has already been installed unsuccessfully, and now the printer does not work. First, it shows the main method with a proper UPD reinstall, and then a backup method through the INF file inside the driver package.
Official driver download:
Download Samsung Universal Print Driver 3 (official link)
Note: the official link points to an HP server because support for Samsung printers is now handled by HP.
Before installation (important)
Important: two different installation scenarios are described below. The order of actions is different in each case.
If you install through the EXE file (Method 1): for a USB printer, do not connect the printer to the computer in advance. Connect it only when the installer asks you to. If you connect the printer first, Windows may install its own driver automatically, and that often interferes with a normal UPD installation.
If you have a Samsung network printer: before installing through the EXE file, make sure the printer is turned on and connected to the same network as the computer.
If you install through the INF file (Method 2): for a USB printer, this method is easier when the printer is already connected and turned on, because Windows usually creates a USB port for the device, most often USB001. If Windows shows a new hardware message, click Cancel and continue with the instructions.
If you install a network printer through the INF file: this method is easier when you already know the printer IP address.
If the archive or installer extracts with an error, try 7-Zip.
Method 1. Reinstall Samsung Universal Print Driver 3 correctly
Step 1. Prepare the printer and the computer
- Close Word, your PDF viewer, and other programs.
- If you have a USB printer, turn the printer off and disconnect the USB cable from the computer.
- If you have a network printer, make sure the printer is turned on and connected to your network.
Step 2. Remove the old printer from Windows
Windows 11
- Click Start.
- Open Settings.
- Open Bluetooth & devices.
- Open Printers & scanners.
- Find your Samsung printer in the list.
- Select it.
- Click Remove.
- Confirm the removal.
Windows 10
- Click Start.
- Open Settings.
- Open Devices.
- Open Printers & scanners.
- Find your Samsung printer in the list.
- Select it.
- Click Remove device.
- Confirm the removal.
If the list contains several similar Samsung printers, remove all entries related to this device.
Step 3. Remove the old Samsung driver from the system
Windows 11
- Open Start.
- Open Settings.
- Go to Bluetooth & devices.
- Open Printers & scanners.
- Scroll down and click Printer server properties.
Windows 10
- Open Start.
- Open Settings.
- Go to Devices.
- Open Printers & scanners.
- Click Printer server properties.
The next steps are the same in Windows 10 and Windows 11
- Open the Drivers tab.
- Find Samsung Universal Print Driver 3 or another Samsung driver that is already installed.
- Select it.
- Click Remove….
- If a choice appears, select Remove driver and driver package.
- Click OK.
If the driver does not uninstall, first cancel all jobs in the print queue and then try again.
Step 4. Restart the computer
After restarting, for a USB printer, do not reconnect the cable until you start the driver installation.
Step 5. Run Samsung Universal Print Driver 3 installation
- Find the file
SamsungUniversalPrintDriver3_V3.00.16.0101.01.exe. - Right-click it.
- Select Run as administrator.
- If Windows asks for permission, click Yes.
- Click Next > through the setup steps and accept the installation terms.
- If the installer asks you to choose the connection type:
- for a USB printer, choose the USB or local printer option;
- for a network printer, choose the network printer option or the option to search for a printer on the network.
- If you have a USB printer, do not connect the printer until the installer tells you to do so.
- When the installer asks you to connect the device:
- for a USB printer, connect the USB cable and turn the printer on;
- for a network printer, wait for the installer to find the printer on the network, or enter it manually if the program asks for that.
- If Windows shows a new hardware message, click Cancel and continue with the installation.
- Wait until the installation is finished.
- Click Finish.
Below is a short video showing a standard driver installation through the installer.
Step 6. Check whether the printer appeared
Windows 11
- Open Start → Settings.
- Open Bluetooth & devices.
- Open Printers & scanners.
- Find the installed Samsung printer in the list.
Windows 10
- Open Start → Settings.
- Open Devices.
- Open Printers & scanners.
- Find the installed Samsung printer in the list.
If the printer appears, open Printer properties and click Print Test Page.
If UPD still does not work
If the printer still does not print after a proper reinstall of Samsung Universal Print Driver 3, move to the backup method through the INF file. This method is especially useful if the normal installer ended with an error, did not create the printer, or created it but the device still does not work.
Method 2. Install the driver manually through INF
The Samsung Universal Print Driver 3 package contains an INF file that can be used to add the driver manually. This is a normal working option if the regular installer did not help.
Step 1. Extract the driver package
- Create a separate folder, for example on the Desktop.
- Extract the contents of the archive or the driver package into that folder.
- If your normal archive tool shows an error, try 7-Zip.
Step 2. Find the us016.inf file
Open the extracted driver folder. If there is another folder with the same name inside it, open that as well. Then go to:
SamsungUniversalPrintDriver3_V3.00.16.0101 → Printer → UPD
In the UPD folder, find the file us016.inf.
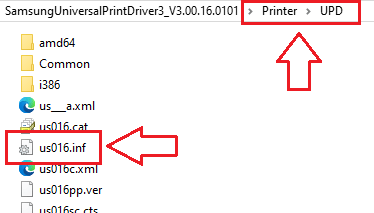
If file extensions are hidden and you cannot find us016.inf, look for a file named us016. It is the same file. Windows may simply have file extensions hidden.
Step 3. Add the printer manually through Have Disk…
Windows 11
- Click Start.
- Open Settings.
- Open Bluetooth & devices.
- Open Printers & scanners.
- Click Add device.
- Wait a few seconds.
- If the required printer is not found, click Add a new device manually.
- Select Add a local printer or network printer with manual settings.
- Click Next >.
- Choose one of the following:
- for a USB printer, select Use an existing port and choose USB001;
- for a network printer, select Create a new port, then Standard TCP/IP Port, and enter the printer IP address.
- Click Next >.
- Click Have Disk….
- Click Browse….
- Browse to the
us016.inffile. - Click Open, then OK.
- Select the Samsung driver from the list.
- Click Next >.
- If needed, enter a printer name.
- Finish the installation.
Windows 10
- Click Start.
- Open Settings.
- Open Devices.
- Open Printers & scanners.
- Click Add a printer or scanner.
- Wait for the device search to finish.
- Click The printer that I want isn’t listed.
- Select Add a local printer or network printer with manual settings.
- Click Next >.
- Choose one of the following:
- for a USB printer, select Use an existing port and choose USB001;
- for a network printer, select Create a new port, then Standard TCP/IP Port, and enter the printer IP address.
- Click Next >.
- Click Have Disk….
- Click Browse….
- Select the
us016.inffile. - Click Open, then OK.
- Select the Samsung driver from the list.
- Click Next >.
- Finish the installation.
If USB001 is not listed, close the wizard, make sure the USB printer is connected and turned on, wait 20 to 30 seconds, and start adding the printer again. If USB001 still does not appear after that, choose another available USB port from the list.
If you do not know the IP address of a network printer, it is better to try Method 1 first. For manual INF installation of a network printer, it is easier to work with a known device IP address.
Step 4. Check printing
- Open Printer properties.
- Click Print Test Page.
If the test page prints, the driver was installed correctly.
Below is a short video showing an example of manual driver installation through Have Disk….
If the driver is installed but printing works incorrectly
Sometimes the driver installs and the printer is visible in the system, but print jobs hang, printing has errors, or the document prints incorrectly.
Start with three simple checks
- Print a Windows test page.
- Print 2 or 3 lines from Notepad.
- Try printing the same file from another program.
Disable advanced printing features
- Open Printers & scanners.
- Select your printer.
- Open Printer properties.
- Go to the Advanced tab.
- Clear Enable advanced printing features.
- Click Apply.
- Send Print Test Page again.
Clear the print queue
- Open your printer in Printers & scanners.
- Open the print queue.
- Cancel all jobs.
- If the jobs do not disappear, restart the computer and check again.
If necessary, recreate the printer
If the printer is visible but prints unreliably, remove it and add it again using the method that worked for you: either the regular UPD installation or Have Disk….
If UPD and INF did not help
Then try the built-in Windows drivers.
Important: this wizard adds only the driver to Windows. After that, the printer itself still has to be added manually through Printers & scanners.
- Open Printer server properties.
- Open the Drivers tab.
- Click Add….
- Click Next >.
- Select x64.
- Click Next >.
- On the driver selection page, click Windows Update.
- Wait while Windows updates the list.
- If a suitable Samsung driver appears in the list, select it.
- Finish adding the driver.
- After that, add the printer itself manually.
If the printer stopped working after a Windows update
The order of actions is the same:
- remove the printer;
- remove the old Samsung driver;
- restart the computer;
- for a USB printer, do not connect the cable in advance;
- reinstall Samsung Universal Print Driver 3;
- if that does not help, install the driver through
us016.inf; - if that does not help, try the built-in Windows driver.
Brief summary
If you cannot install Samsung Universal Print Driver 3 correctly or use it normally with a Samsung printer, the best order is this:
- remove the old printer and the old driver;
- restart the computer;
- for a USB printer, install Samsung Universal Print Driver 3 only while the USB cable is disconnected;
- connect the USB printer only when the installer asks you to do so;
- if the normal installation does not help, use Have Disk… and the
us016.inffile; - if the driver is installed but printing works incorrectly, disable advanced printing features and test printing from Notepad.


Leave a Reply