Last Updated on 30.01.2026 by DriverNew
This guide will help if your HP LaserJet Pro P1106w (P1100w Series) used to work (for example, on Windows 10), but on Windows 11:
- the driver won’t install using Setup.exe;
- the installer does not detect the printer via USB;
- the printer is added, but doesn’t print.
There are two methods below. Start with the first one—it’s faster. If it doesn’t help, use the second one—it’s more reliable.
If you’ve already tried installing and “nothing worked”, it’s best to remove old printer entries and reboot your PC.
How to remove old entries:
Settings → Bluetooth & devices → Printers & scanners → remove all HP LaserJet printers (if any) → restart your PC.
Method 1 (quick): install via Setup.exe and select the P1560 Series
On Windows 11, the HP installer may fail specifically with the P1106w (P1100w Series). However, choosing a closely related series sometimes allows the driver to install and the printer to start working.
Official HP driver download for Windows 10, Windows 8, Windows 8.1, Windows 7, Windows Vista, Windows XP (64-bit / 32-bit):
![]()
Driver installation steps:
- Disconnect the USB cable from the printer (if it’s connected).
- Run the driver installer Setup.exe (recommended: right-click → Run as administrator).
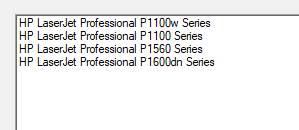
- On the “Select Printer” step, choose: HP LaserJet Professional P1560 Series.
- Complete the installation.
- Connect the printer via USB and try printing.
If the printer prints, you’re done.
If Setup.exe didn’t help, proceed to Method 2.
Method 2 (reliable): install via INF (Have Disk) on Windows 11 using a USB connection
This method helps when Setup.exe won’t install the printer or the printer doesn’t print after installation.
What you need:
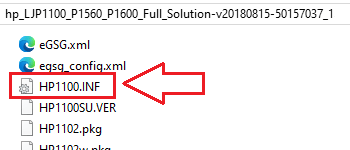
- Driver package (archive/file): hp_LJP1100_P1560_P1600_Full_Solution-v20180815-50157037_1
- INF file: HP1100.INF
Extract the archive
After extracting, the INF file is located here:
…\hp_LJP1100_P1560_P1600_Full_Solution-v20180815-50157037_1\HP1100.INF
 If file extensions are not shown in the folder (for example, .INF) and you cannot find the file HP1100.INF, look for a file named HP1100. It is the same file. In Windows, file extensions may be hidden, so the .INF part is not visible and the file appears as HP1100 instead of HP1100.INF.
Install via INF (Have Disk): Option A (via “Printers & scanners”)
- Connect the printer via USB.
- Open: Settings → Bluetooth & devices → Printers & scanners
- Click Add device.
- If the printer doesn’t appear, click “The printer that I want isn’t listed”.
- Select: Add a local printer or network printer with manual settings.
- Select a port:
- Use an existing port
- usually USB001 (Virtual printer port for USB)
- Click Have Disk….
- Click Browse… and select: …\HP1100.INF
- From the list, select HP LaserJet Professional P1106w.
- Finish the wizard and print a test page.
This video shows you how to install a device driver manually using “Have Disk” in the Windows operating system.
Install via INF (Have Disk): Option B (via “Device Manager”)
This option is useful if Windows shows the printer as an unknown device.
- Connect the printer via USB.
- Open Device Manager.
- Find the device with a yellow warning icon (often under “Other devices” or “Universal Serial Bus controllers”).
- Right-click → Update driver
- Browse my computer for drivers
- Let me pick from a list of available drivers on my computer
- Have Disk… → select HP1100.INF
- Select HP LaserJet Professional P1106w → Next → Finish
If the printer is installed but still doesn’t print: quick checklist
- Reconnect the USB cable to a different port (rear ports on a desktop PC are usually better).
- Make sure the correct port is selected (USB001 / DOT4_001).
- Remove the printer and reinstall it via INF (sometimes Windows creates extra/incorrect print queues).


Leave a Reply