Last Updated on 27.03.2026 by DriverNew
 Canon PIXMA MP240 is an older all-in-one printer. Because of that, problems with installing the driver and scanning software are more common on newer versions of Windows. Usually, the user runs into one of two situations: the installer does not start or does not finish the installation, or printing works but scanning does not.
For Canon PIXMA MP240, the main package is MP Driver Ver. 1.02. The most important issues occur on Windows 11 and Windows 10, so the instructions below start with those systems. If you have Windows 8, Windows 8.1, or Windows 7, the order of actions is the same, but installation usually goes more smoothly.
Direct links to Canon PIXMA MP240 drivers
If you have 64-bit Windows, download the file md64-win-mp240-1_02-ea24.exe.
If you have 32-bit Windows, download the file md86-win-mp240-1_02-ea24.exe.
Scanning and photo software
MP Navigator EX Ver. 2.05: download the file mpnx_2_0-win-2_05-ea23_2.exe
This is the main scanning application for the Canon PIXMA MP240. It lets you scan documents and photos, save files, print scanned images, and configure how the SCAN button on the device works. For this model, it is an important application. If MP Navigator EX is not installed, the SCAN button may not work the way the user expects.
My Image Garden Ver. 3.6.4a: download the file mig_-win-3_6_4a-ea31_2.exe
This is an additional application for sorting and printing photos and for creating simple photo projects. It is not required for the basic operation of the printer and scanner. If you are having problems installing the Canon PIXMA MP240, first install the driver and MP Navigator EX. It is better to install My Image Garden only after that, and only if you actually need it.
Where to start on Windows 11 and Windows 10
On Windows 11 and Windows 10, it is better not to connect the printer to the computer in advance. First run the driver installation, go through the main installer steps, and only at the last stage connect the USB cable and turn on the printer. If you connect the device too early, Windows may install its standard driver, and then the Canon installation may fail or be incomplete.
If you have already tried to install the MP240 before, first remove old printer entries and old drivers. To do that, disconnect the printer from USB, open Settings, then Bluetooth & devices, then Printers & scanners, find Canon MP240, and remove the device if it is listed there. After that, restart the computer.
Then open Device Manager. The easiest way is to right-click the Start button and select Device Manager. If that option is not there, select Start, type Device Manager, and open the app from the search results. In Device Manager, check Printers, Print queues, Imaging devices, and Other devices. If you see Canon MP240 or an unknown device related to this all-in-one printer, remove it. After removing it, restart the computer again.
How to find out whether your Windows version is 64-bit or 32-bit
If you do not know which driver to download, open Settings, then System, then About. In System type, you will see whether you have 64-bit or 32-bit Windows. After that, download the correct driver file.
Step 1. Standard installation using the EXE file
This is the main installation method. For most users, it should be the first option to try.
Download the correct EXE file, find it in the Downloads folder, right-click it, and select Run as administrator. If Windows shows a User Account Control window, click Yes. Then follow the prompts in the installation wizard.
At this stage, it is important to remember that the printer should not be connected in advance. First complete the main installation steps. Connect the printer by USB and turn it on only at the last stage, when the installer is almost finished and prompts you to complete the process.
After the installation is complete, restart the computer and check whether Canon MP240 appears in the list of printers.
Step 2. If the EXE file does not start or the installation fails, enable compatibility mode
On Windows 11 and Windows 10, older Canon installers do not always start on the first try. In that situation, first try compatibility mode.
Right-click the driver file, open Properties, and go to the Compatibility tab. Enable compatibility mode for Windows 8 and also enable running it as administrator. Then click Apply, click OK, and run the installer again.
If the installation still does not start, ends with an error, cannot see the printer, or installs only part of the components, continue to the next step. Manual installation through INF files is needed specifically for these situations. It is not required for all users. It is a backup method for cases where the normal EXE installation did not help.
Step 3. If the EXE installation did not help, extract the EXE file like an archive
The file md64-win-mp240-1_02-ea24.exe is not just an installer. It is also an archive containing the driver files. You can extract it to a separate folder and then manually install both the printer driver and the scanner driver. This method is useful when the standard installation did not work or only installed part of the components.
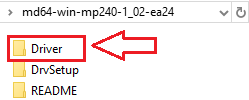
To extract the files from the EXE, install 7-Zip or WinRAR if you do not already have an archive utility. Then right-click the EXE file and choose the extract command in 7-Zip or WinRAR. After extraction, open the resulting folder and find the Driver folder inside.
In the Driver folder, there are two main files. MP240PR.inf is the printer driver. MP240SC.INF is the scanner driver. These are the files used for manual installation.

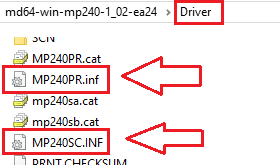 If Windows is hiding file extensions, the .inf ending may not be shown. In that case, look for the files named MP240PR and MP240SC. They are the same files. Windows may simply be hiding the extensions.
Step 4. Manually install the printer driver using INF
If the normal installation did not help, extract the EXE file to a separate folder, then connect the printer to the computer by USB and turn it on. After that, open Device Manager. Find Canon MP240, an unknown device, or a device with an error icon in Printers, Print queues, or Other devices.
Right-click the device and select Update driver. Then choose the option to browse for drivers on your computer. After that, specify the path to MP240PR.inf. Confirm the installation. If Windows shows a warning, confirm that you want to continue. After that, the printer driver should be installed.
Step 5. Manually install the scanner driver using INF
If the printer already prints but the scanner is not detected, you need to install the scanner driver separately. To do that, open Device Manager again and find the device with an error icon in Imaging devices, Other devices, or a similar section related to the scanner.
Right-click the device, select Update driver, then choose the option to browse for drivers on your computer and select MP240SC.INF. After the installation is complete, Windows should detect the scanner correctly.
This video shows how to manually install a driver using “Have Disk…”
Step 6. Install MP Navigator EX
After installing the drivers, install MP Navigator EX if you need scanning. For Canon PIXMA MP240, this is an important application because it is used to scan documents and photos. Also, when you press the SCAN button on the device, it is MP Navigator EX that launches. This is an important detail that many users do not know.
If MP Navigator EX is not installed, the SCAN button may do nothing, or scanning may start incorrectly. For that reason, after installing the print driver and the scanner driver, it is best to install MP Navigator EX right away, then first test scanning from the computer, and only after that test the SCAN button on the device itself.
To install it, download the MP Navigator EX file, run it as administrator, wait for the installation to finish, and restart the computer.
Step 7. Check after installation
After installation, it is best to test the device in order. First, check printing. To do that, open Settings, then Bluetooth & devices, then Printers & scanners, select Canon MP240, open the printer properties, and print a test page. If the test page prints, the printer driver is installed correctly.
After that, test scanning from the computer. Open the Start menu, find MP Navigator EX, launch the application, place a document on the scanner glass, and scan from the application itself. If scanning from the application works, the scanner driver is installed correctly.
Only after that should you test the SCAN button on the device. If the SCAN button does not work, but scanning from MP Navigator EX works, the problem is usually not with the scanner itself, but with how MP Navigator EX is launched when the button on the device is pressed.
Installation on Windows 8.1, Windows 8, and Windows 7
On Windows 8.1, Windows 8, and Windows 7, installation usually goes more smoothly. The order of steps stays the same. First download the correct EXE file, then run it as administrator and go through the installation wizard. Do not connect the printer in advance. Connect it only at the final stage of the installation. After that, install MP Navigator EX if needed, restart the computer, and test printing and scanning.
What to do if printing works but scanning does not
This is one of the most common problems with the Canon PIXMA MP240. In most cases, the reason is that only the printer driver is installed, while the scanner driver or MP Navigator EX is not installed.
In that situation, first make sure the scanner driver is installed using MP240SC.INF. Then install MP Navigator EX and test scanning specifically from that application. If scanning then works only from the computer, but the SCAN button on the device still does not launch the application, start with a simple computer restart and test again.
What to do if the printer is not detected
If the device is not detected during installation, first make sure the cable is connected directly to a USB port on the computer and not through a USB hub. Then try a different USB port. After that, turn the printer off and back on again. If the device still is not detected, open Device Manager and check whether an unknown device appears there. If it does, manually install the driver using MP240PR.inf.
What to do if the installer closes with an error
If the EXE file does not start or closes with an error, first move it to a simple folder, for example a folder on drive C:. Then try Run as administrator and compatibility mode for Windows 8. If that does not help, extract the EXE file like an archive and install the driver manually through the INF files.
What to do if you installed My Image Garden but the scanner still does not work
This is normal. My Image Garden does not replace the scanner driver and does not replace MP Navigator EX. If you are having scanning problems, the printer driver, scanner driver, and MP Navigator EX must all be installed correctly first. Only after that does it make sense to install My Image Garden as an additional application.
Short conclusion
For Canon PIXMA MP240 on Windows 11 and Windows 10, the most reliable order is: remove old failed installations, download the correct EXE file, do not connect the printer in advance, try the normal EXE installation, and if that does not help, extract the EXE file like an archive and manually install the printer driver through MP240PR.inf and the scanner driver through MP240SC.INF. After that, install MP Navigator EX, test printing, then test scanning from the computer, and only after that test the SCAN button on the device.


Leave a Reply