Last Updated on 22.05.2026 by DriverNew
![]() Drivers and software for operating systems Windows 11, Windows 10, Windows 8, Windows 8.1, Windows 7, Windows Vista, Windows XP (64-bit / 32-bit)
Drivers and software for operating systems Windows 11, Windows 10, Windows 8, Windows 8.1, Windows 7, Windows Vista, Windows XP (64-bit / 32-bit)
On the official Canon website for the Canon PIXMA MG2140 printer, you can download several different files that contain drivers and software. We recommend downloading and installing the drivers contained in the “MP Driver” file. This file contains drivers for the printer and scanner, as well as software for the scanner: “IJ Scan Utility.” Installing these drivers will not cause any problems. After installing these drivers, you will be able to use all the functions of your printer and scanner.
You can download the file containing all the necessary drivers and software for Canon PIXMA MG2140 printer on this page of the website. The file will be downloaded from the official Canon website.
![]()
Software for Windows operating systems
![]()
Download drivers and software for Windows
“MG2100 series MP Drivers” File version: 1.02. File Size: 21 MB
How to install drivers for printer and scanner: Canon PIXMA MG2140. Do not connect the printer to the computer. Start installing the software first. During the installation process, a message will appear on the monitor informing you when to connect the printer to your computer.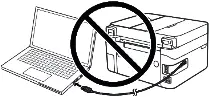 If you see the message ‘Found New Hardware’ on the screen, click Cancel and disconnect the USB cable. Then proceed to install the software. A common mistake when installing a driver is that you first connect the device to your computer using a USB cable and then install the driver. In this case, the operating system detects the connected device and installs its own driver, which may not work correctly or not work at all. However, some other devices may work fine with the driver installed by the operating system. Therefore, if there is a driver specially created for your device, then first start installing this driver and only then connect the device to the computer.
Scanner Driver: If the OS is upgraded with the scanner driver remained installed, scanning by pressing the SCAN button on the Printer may not be performed After the upgrade. in such cases, re-install the scanner driver.
Canon PIXMA MG2140
![]() Important information for modern ARM laptop owners!
Important information for modern ARM laptop owners!
If your computer or laptop runs on the Windows 11 ARM operating system (for example, based on the latest Qualcomm Snapdragon X Elite, Snapdragon X Plus, or similar processors), you will not be able to install standard x86/x64 drivers from Canon. Due to the architectural features of the system, a classic launch of the installation file via a USB cable for the PIXMA and MAXIFY lineups leads to compatibility errors.
Nevertheless, wireless models can be successfully configured for basic printing without using official Canon software. How to bypass system limitations, start printing via Wi-Fi, and organize free document scanning is described in detail in our separate guide. Follow the link to read the material: Step-by-step instructions for installing Canon PIXMA/MAXIFY on Windows 11 ARM.
How to scan documents and photos
The ‘IJ Scan Utility’ is software for conveniently scanning photographs, documents, etc. In the Windows operating system, click the ‘Start’ button to find the shortcut for the ‘IJ Scan Utility’ software. You can then use your computer mouse to drag this shortcut to your desktop.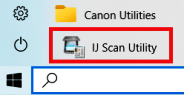
 If you find it difficult to understand the settings of this software, then I offer you the easiest way to scan any documents and photos. To do this, use one button ‘Photo’. By clicking on this button, you can scan any documents and photos. The scanned document will be saved to your computer. The quality of the scanned documents is good, so you do not need to change the software settings. Many users of this software use one ‘Photo’ button to scan documents or photos. If you need to change the location where the scanned image will be saved or change other scanner settings, then use the “Settings” button for this.
Canon PIXMA MG2140
How to Install Drivers for Canon PIXMA MG2140 in Windows 11
A step-by-step guide to installing drivers for Canon PIXMA MG2100 Series devices in the Windows 11 operating system.
The Canon PIXMA MG2140, MG2150, and MG2155 multifunction printers belong to the same hardware family (MG2100 Series) and use identical software. Canon has not officially released Windows 11 drivers for these models, which causes standard installers to be blocked by the system and prevents the printer from printing or scanning.
Below are verified methods to bypass Windows 11 security restrictions and get your MFP up and running.
Step 1. System Preparation
Before installation, you must remove old, failed instances of the device to avoid conflicts:
- Disconnect the printer’s USB cable from the computer.
- Open Settings (Win + I shortcut) → Bluetooth & devices → Printers & scanners.
- If you see devices named Canon MG2100 Series, Canon MG2140/2150, or “Unknown device” in the list, click on them and select “Remove”.
Step 2. Downloading the Driver
- Go to the official Canon support website.
- In the operating system selection field, manually select Windows 10 (64-bit) (this driver is fully compatible with Windows 11).
- Download the “MG2100 series MP Drivers” package (version 1.02). This is a universal driver containing components for both printing and scanning.
- Important: Do not run the downloaded file with a regular double-click.
Step 3. Forced Installation Methods
Method 1. Running via Compatibility Mode
This method forces Windows 11 to ignore security blocks and run the standard Canon installer.
- Right-click the downloaded driver file (its name starts with
mp68-...) and select “Properties”. - Go to the “Compatibility” tab.
- Check the box next to “Run this program in compatibility mode for:” and select “Windows 8” (or Windows 7) from the list.
- At the bottom of the same window, check the box for “Run this program as an administrator”.
- Click “Apply”, then “OK”.
- Run the file. Connect the printer’s USB cable to the computer only when the setup program prompts you to do so on the screen.
Method 2. Direct Installation via Device Manager
Use this method if Method 1 freezes, crashes, or throws an error during file copying.
- Install any free file archiver (such as 7-Zip).
- Right-click the downloaded Canon driver file, select 7-Zip → Extract to… (the program will extract the installer files into a regular folder of the same name).
- Connect the printer to the computer using the USB cable and turn on its power.
- Right-click the Start button on the taskbar and select “Device Manager”.
- Look for a device with a yellow exclamation mark in the list (usually found under “Printers”, “Print queues”, or “Other devices” sections).
- Right-click it and select “Update driver”.
- Select “Browse my computer for drivers”.
- Click the “Browse…” button, specify the path to the previously created folder with the extracted files, and click “Next”. The system will automatically install the printer directly.
Step 4. Scan Configuration
The proprietary Canon IJ Scan Utility often runs unstably on Windows 11.
You can scan using free Windows tools or the NAPS2 app.
Windows Scan is a free app for Windows 11, Windows 10, and Windows 8.1 that you can download from the Microsoft Store and use to scan documents and pictures.
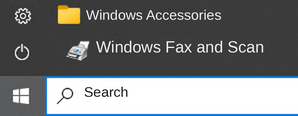
Windows Fax and Scan is a built-in app for Windows 10, 8.1, 8, and 7. To open it, click Start or use Windows Search. In the search box, type: Windows Fax and Scan.
NAPS2 is a free scanning app that lets you save files as PDF, TIFF, JPEG, or PNG and offers more flexible settings.
To learn more about these apps, which one to choose, and how to use them, read this article.
Important: These apps require a scanner driver. If a driver from the manufacturer is available for your model, it is best to install it first. If Windows has already installed a driver automatically and scanning works properly, reinstalling it is usually not necessary.


Leave a Reply