Last Updated on 16.12.2023 by DriverNew
 Drivers and software for operating systems: Windows 11, Windows 10, Windows 8, Windows 8.1, Windows 7, Windows Vista (64-bit / 32-bit)
Lexmark MB2236adw – Several files are available for download on the official Lexmark website for this model, and it is not always clear which one you should choose. This article provides links to verified installation files from the official Lexmark website that contain the necessary drivers and software for the full operation of the device and usually do not cause installation problems. The article also includes instructions for the proper installation of the software (Lexmark MB2236adw).
How to install the printer driver correctly: Do not connect the printer to the computer. Start installing the software first. During the installation process, a message will appear on the monitor informing you when to connect the printer to your computer.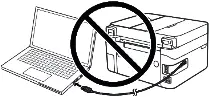 If you see the message ‘Found New Hardware’ on the screen, click Cancel and disconnect the USB cable. Then proceed to install the software. A common mistake when installing a driver is that you first connect the device to your computer using a USB cable and then install the driver. In this case, the operating system detects the connected device and installs its own driver, which may not work correctly or not work at all. However, some other devices may work fine with the driver installed by the operating system. Therefore, if there is a driver specially created for your device, then first start installing this driver and only then connect the device to the computer.
![]()
Software for Windows operating systems
![]()
Download drivers and software for Windows
(Printer, scanner drivers and other software)
Lexmark MB2236adw : Prepare the printer for connection to your computer in advance. Remove the packaging from the printer and install the cartridge and paper.
Installing software for the Windows operating system
Double-click the downloaded .exe file. It will be decompressed and the Setup screen will be displayed. Follow the instructions to install the software and perform the necessary settings.
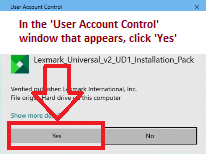 In the ‘User Account Control’ window that appears, click ‘Yes’.
 Select ‘New Install’ and click ‘Start’.
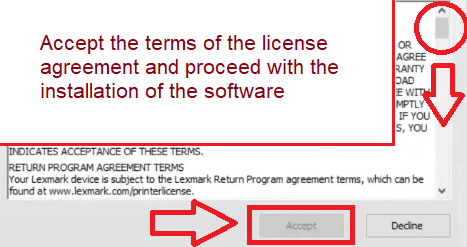 Accept the terms of the license agreement and proceed with the installation of the software.
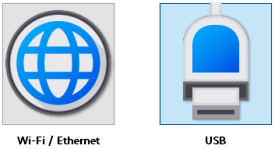
Select a method to connect to your computer and continue installing the software. If you choose to connect using a USB cable, connect the printer to your computer only after you have completed installing the software.
Lexmark MB2236adw
Printer description: Lexmark MB2236ADW 4-in-1 mono laser multifunction device (printer, copier, scanner, fax, WiFi, LAN, up to 34 ppm, automatic. Print on both sides) black / grey. The compact, powerful and affordable Lexmark MB2236adw multifunction printer delivers up to 34 ppm in mono and also offers Wi-Fi, two-sided printing, scanning and faxing. One 1 GHz dual-core processor and 512 MB of memory allows printing up to 34 ppm. Steel frame and sturdy construction for heavy duty and harsh environments. Easy connection via Ethernet, USB, WLAN or easy mobile printing options.
How to scan documents and photos.
Lexmark Scanback Utility is software for a network-connected scanner.![]()
Download scanner software – ‘Lexmark Scanback Utility’
Using “Lexmark Scanback Utility”. From the computer, run “Lexmark Scanback Utility”, and then click “Next”. Click “Setup”, and then add the printer IP address. View the printer IP address on the printer home screen. The IP address appears as four sets of numbers separated by periods, such as 123.000.000.000. Click “Close” – “Next”.
Select the size of the original document, and then click “Next”. Select a file format and scan resolution, and then click “Next”. Type a unique scan profile name, and then click “Next”. Browse to where you want to save the scanned document, set a file name, and then click “Next”. Click “Finish”. To reuse the scan profile, enable “Create Shortcut”, and then type a unique shortcut name. Load an original document into the automatic document feeder or on the scanner glass.
Depending on your printer model, from the control panel, do either of the following: Option 1. Touch Scan to Computer, and then select a scan profile. Make sure that Scan to Computer is enabled. From the home screen, touch “Settings” – “Device” – “Visible Home Screen Icons”. Option 2. Navigate to “Shortcuts” – “OK” – “Scan to Computer” – “OK”, and then select a scan profile.
This video shows and explains in detail how to use the “Lexmark Scanback Utility” software.
![]()
Lexmark MB2236adw
If you have problems using this software, you can use the easier way to scan documents and photos.
You can scan using free Windows tools or the NAPS2 app.
Windows Scan is a free app for Windows 11, Windows 10, and Windows 8.1 that you can download from the Microsoft Store and use to scan documents and pictures.
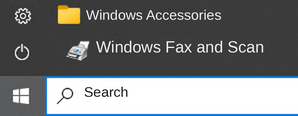
Windows Fax and Scan is a built-in app for Windows 10, 8.1, 8, and 7. To open it, click Start or use Windows Search. In the search box, type: Windows Fax and Scan.
NAPS2 is a free scanning app that lets you save files as PDF, TIFF, JPEG, or PNG and offers more flexible settings.
To learn more about these apps, which one to choose, and how to use them, read this article.
Important: These apps require a scanner driver. If a driver from the manufacturer is available for your model, it is best to install it first. If Windows has already installed a driver automatically and scanning works properly, reinstalling it is usually not necessary.
Lexmark MB2236adw
![]()
Software for MAC operating systems
On computers running the Macintosh operating system – macOS 10.7 or later, you do not need to install a printer driver. Use AirPrint software to print. Therefore, there is no need to download and install drivers.
How to scan documents and photos.
Make sure that the printer is added to the computer. Load an original document into the automatic document feeder or on the scanner glass. From the computer, do either of the following: Open “Image Capture” or Open “Printers and Scanners”, and then select a printer. Click “Scan” – “Open Scanner”. From the Scanner window, do one or more of the following: Select where you want to save the scanned document. Select the size of the original document. To scan from the ADF, select “Document Feeder” from the Scan Menu or enable “Use Document Feeder”. If necessary, configure the scan settings. Click “Scan”.


Leave a Reply