Last Updated on 09.10.2024 by DriverNew
 Drivers and software for operating systems Windows 11, Windows 10, Windows 8, Windows 8.1, Windows 7, Windows Vista, Windows XP (64-bit / 32-bit)
Printer Model: Canon imageCLASS MF6595CX
There are several different drivers for the Canon imageCLASS MF6595CX printer and many users do not know which drivers to choose to install. We recommend downloading a driver file called ‘MFDriver’.
This file contains all the necessary drivers for the Canon imageCLASS MF6595CX printer and scanner. You don’t need any other drivers. If you don’t want to search for these drivers and software yourself, you can download them from the links on this page of the website. Driver downloads will be from the same links found on the Canon website.
How to install the printer driver correctly: Do not connect the printer to the computer. Start installing the software first. During the installation process, a message will appear on the monitor informing you when to connect the printer to your computer.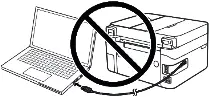 If you see the message ‘Found New Hardware’ on the screen, click Cancel and disconnect the USB cable. Then proceed to install the software. A common mistake when installing a driver is that you first connect the device to your computer using a USB cable and then install the driver. In this case, the operating system detects the connected device and installs its own driver, which may not work correctly or not work at all. However, some other devices may work fine with the driver installed by the operating system. Therefore, if there is a driver specially created for your device, then first start installing this driver and only then connect the device to the computer.
![]()
Download drivers and software for Windows (64-bit)
Download drivers and software for Windows (32-bit)
Canon imageCLASS MF6595CX Printer and Scanner Drivers
Driver Version : UFR II Printer Driver – V2.00, PCL5e/5c Printer Driver – V8.00, PCL6 Printer Driver – V6.00, Fax Driver – V5.00, ScanGear – V11.3
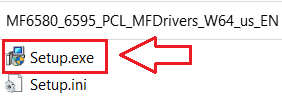
Installing the printer and scanner driver for Canon imageCLASS MF6595CX. Double-click the files to decompress them. A new folder will be created in the same folder. The new folder will have the same name as the compressed file. Double-click the decompressed Setup.exe file to start installation.

Canon imageCLASS MF6595CX
After installing the drivers, restart your computer and install the scanning software.
Tool Box Ver.4.9.1.1.mf18
Scanning Software – Tool Box
![]()
File Size: 9.47 MB. File version: 4911mf18
File name: ToolBox4911mf18WinEN.exe
Settings of the ‘ToolBox’ software for the Canon scanner.
Instructions on how to scan using the “ToolBox” software (ver. 4.9.1.1.mf18) and easy settings for Canon scanner. Install the scanner driver first, and then install the “ToolBox” software. After installing the “ToolBox” software, a shortcut to this software will be created on the desktop of the computer.
 To set up the software, connect the device to a computer and click the “Color Scan” button.
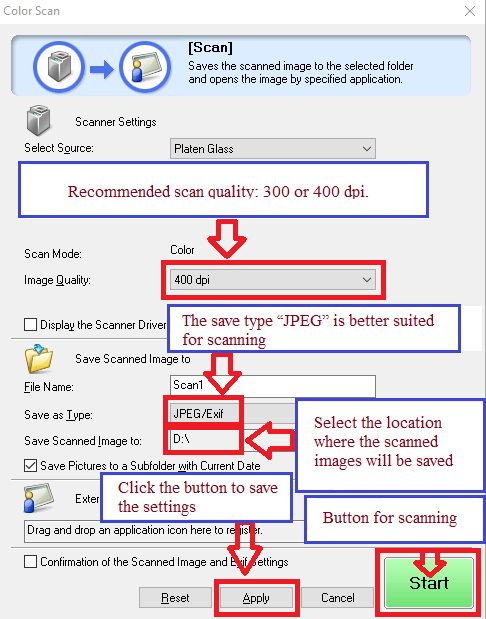 Scanning quality is recommended to be set: 300 or 400 dpi (suitable for scanning any documents and photos). The higher the quality, the longer the scan takes and the larger the file size. The save type “JPEG” is better suited for scanning. Select the location where the scanned images will be saved. Click the “Apply” button to save the software settings. No other settings are required. To scan, press the ‘Start’ button. The software allows you to scan quickly and conveniently.
Canon imageCLASS MF6595CX
You can scan using free Windows tools or the NAPS2 app.
Windows Scan is a free app for Windows 11, Windows 10, and Windows 8.1 that you can download from the Microsoft Store and use to scan documents and pictures.
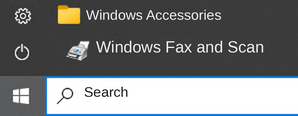
Windows Fax and Scan is a built-in app for Windows 10, 8.1, 8, and 7. To open it, click Start or use Windows Search. In the search box, type: Windows Fax and Scan.
NAPS2 is a free scanning app that lets you save files as PDF, TIFF, JPEG, or PNG and offers more flexible settings.
To learn more about these apps, which one to choose, and how to use them, read this article.
Important: These apps require a scanner driver. If a driver from the manufacturer is available for your model, it is best to install it first. If Windows has already installed a driver automatically and scanning works properly, reinstalling it is usually not necessary.
Canon imageCLASS MF6595CX
If you cannot scan over a network or with a USB connection in Windows 10, Windows 8.1, Windows 8, install the MF driver, restart (not shut down) your PC, and then install the following program.
![]()
Patch for Network Scan, USB Scan
This patch resolves an issue that prevents scanning over a network or with a USB connection after upgrading Windows to a newer version. If you cannot scan over a network or with a USB connection, install this patch. If installing (or reinstalling) the MF driver, be sure to first restart (not shut down) your PC after driver installation is complete, and then install this patch. If you are using USB scan, be aware that it may cease functioning after any future upgrades to Windows. If this occurs, install this patch again. After installing this patch, if the message prompting you to restart your PC is displayed, restart (not shut down) your PC. If you do not restart your PC, this patch will not take effect.
Canon imageCLASS MF6595CX


Leave a Reply