Last Updated on 15.02.2022 by DriverNew
![]() NexiGo Webcam software and user manual.
NexiGo Webcam software and user manual.
Webcam model: Nexigo N680
NexiGo Webcam Software
Webcam Software for Operating Systems: Windows 11, Windows 10, Windows 8, Windows 8.1, Windows 7, Windows Vista, Windows XP (64-bit / 32-bit) and MAC.
Download Webcam Software for Windows
Download Webcam Software for MAC
NexiGo N680 User Manual
How to download files located on Google Drive:
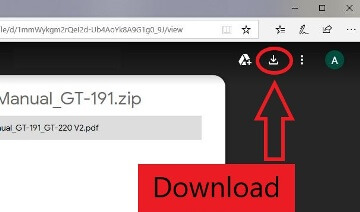 The webcam should be plug and play and requires no extra drivers if your computer is updated to the latest version of the operating system.
Recommended Usage Instructions
NexiGo N680 Webcam
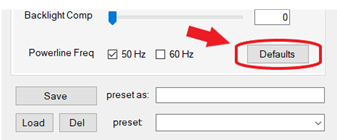
Connect the webcam to any USB 2.0 (or greater) port. It will take a few seconds for the computer to recognize the webcam. There should be a pop-up notification, but this does not always occur. To ensure the camera has installed correctly: Open the NexiGo webcam application, but make sure that any other applications that may use the camera are closed before doing so. Make sure that the webcam is already plugged in before you open the application. You should see your webcam as an option in the dropdown menu next to the Preview button. Click on the Preview button to bring up the capturing image from your webcam. If you see an image here then your webcam will be working properly.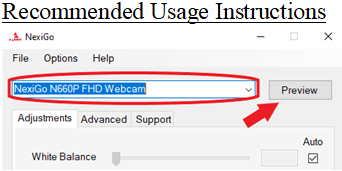 The preview that you see in the NexiGo app will be the image displayed to others in a video conferencing call or seminar. If the image characteristics are not to your liking, you may adjust the setting sliders to ranges that you would prefer. Adjustments made in the NexiGo app will carry over into other programs, with the exception of resolution and frame rate settings. These settings will not carry over and will need to be readjusted in most programs. Before making any other changes always make sure to reset the webcam to default settings first to see if a faulty setting is causing the issue with the image. The default settings button is located at the lower right corner of the application window in both Mac and Windows versions of the program.
- Preset Profiles
With the NexiGo webcam software you are able to save your settings profile to your computer. This way, when you finally find the exact look you are after you can save this as a profile. Then, even if your settings are messed up or reset you can easily restore the style you like with the click of a button.
- To Set a Profile: To set a profile, first make sure you have the NexiGo app open and the changes you want added to the profile have been selected in the app. Please type a name for the profile in the preset as: box. Click Save to save the profile.
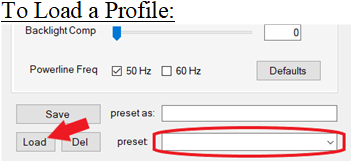
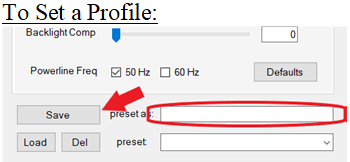 To Load a Profile: To load the profile click the drop down arrow in the box labeled preset. Select the profile you want to load from the list, and then click Load to load in the profile.
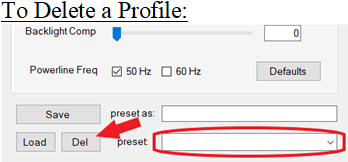
 To Delete a Profile: If the profile is no longer needed you can delete the profile by repeating step 2 from To Load a Profile, but instead of clicking Load please select Del. This will permanently delete this profile, so please make sure you have selected the correct profile before choosing to delete. A pop-up will appear asking if you really want to delete the profile, so you do not need to fear accidentally clicking the wrong box.
 If the webcam image does not pull up upon clicking preview: Plug the webcam into your computer. Go to Computer Management>Device Manager>Cameras, and then click the drop down arrow to expand the menu. Find your webcam, right-click it, and select “Uninstall device”. Once the webcam is uninstalled, unplug the USB cord from your computer. Open the NexiGo Webcam Application as before, making sure that any other applications that may use the camera are closed before doing so. After you have done this, plug the webcam back into the USB port on your computer, not a dock or USB hub. Wait up to 1 minute and then click the Preview button again. Detailed instructions for using the NexiGo Webcam software.


Leave a Reply