Last Updated on 27.03.2026 by DriverNew
 Canon CanoScan LiDE 200 is an older scanner, but it is still widely used. On modern versions of Windows, the most common issues usually look like this: the driver installs, but Windows shows “Device not recognized”, or MP Navigator EX says that the driver cannot be found. In most cases, the cause is an incorrect installation order, connecting the scanner too early, a missing ScanGear driver, or Windows installing its own unsuitable driver before the Canon driver was installed.
For this model, it is especially important to follow the correct installation order. First, install the software, then restart the computer, and only after that prepare the scanner for use, move the lock switch on the bottom to the Unlock position, and connect it by USB. It is best to use the USB cable that came with the scanner. The scanner is powered through USB, so it does not have a separate power button.
Direct links to Canon CanoScan LiDE 200 drivers
If you have 64-bit Windows, download the file lide200vst641403ea24.exe.
If you have 32-bit Windows, download the file lide200vst1403ea24.exe.
Scanning software
MP Navigator EX Ver. 2.05: download the file mpnx_2_0-win-2_05-ea23_2.exe
MP Navigator EX is the main application for convenient scanning with the CanoScan LiDE 200. It lets you scan photos and documents, save files, send them by e-mail, print them, and work in quick-start mode. You can use it for basic scanning or launch ScanGear for more detailed settings.
If MP Navigator EX says “No driver”, this usually does not mean the application itself is faulty. It usually means that the ScanGear driver is not installed, was installed incorrectly, or the scanner is not being detected by the system. That is why MP Navigator EX should be installed after the driver, not instead of the driver.
Where to start on Windows 11 and Windows 10
On Windows 11 and Windows 10, start with the correct order. First remove any old failed installation attempts, then install the Canon driver, and only after that connect the scanner. If you connect the LiDE 200 too early, Windows may immediately assign its own driver to it, which can later cause messages such as “Device not recognized” or “No driver”.
If you connected the scanner before, disconnect it from USB first. Then open Settings, go to the device section, and remove CanoScan LiDE 200 if it is already listed there. After that, open Device Manager. The easiest way is to right-click the Start button and select Device Manager. If that option is not there, select Start, begin typing Device Manager, and open the app from the search results. In Device Manager, check Imaging devices, Other devices, and Universal Serial Bus controllers. If you see CanoScan LiDE 200 or an unknown USB device there, remove it and restart the computer.
After that, download the correct EXE driver file. If you do not know which system you have, open Settings, then System, then About, and look at System type. It will show whether you have 64-bit Windows or 32-bit Windows.
Step 1. Install the driver using the EXE file
For most users, this is the main installation method. Find the downloaded driver file, right-click it, and select Run as administrator. Do not connect the scanner to the computer during installation. This is the key point for the LiDE 200.
If the installation finishes normally, wait for it to complete and restart the computer. After the restart, prepare the scanner. Move the lock slider on the underside of the scanner to Unlock. Then connect the USB cable to the computer and the scanner. After that, Windows should detect the device.
Step 2. If the EXE file does not start or the installation ends with an error
On Windows 11 and Windows 10, the old Canon installer may not start on the first try. In that case, first try compatibility mode. Right-click the EXE file, open Properties, go to the Compatibility tab, enable compatibility mode for Windows 8, and also enable running it as administrator. Then run the installer again.
If that does not help, continue with manual installation using the INF file. This is not required for everyone. It is only needed if the standard EXE installation did not work, did not finish, does not see the scanner, or MP Navigator EX still says the driver is missing afterward.
Step 3. The EXE file can be extracted like an archive
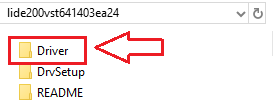
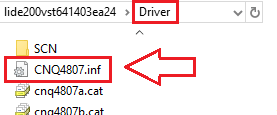
The LiDE 200 driver file is not just an installer. You can extract it to a separate folder and use it for manual installation. After extracting it, open the resulting folder and find the Driver folder inside. In the Driver folder, you will find the file CNQ4807.inf. This INF file is used for manual installation of the scanner driver.
To get these files, install 7-Zip or WinRAR if you do not already have an archive utility. Then right-click the EXE driver file and choose the extract option in 7-Zip or WinRAR. After extraction, open the Driver folder and find the file CNQ4807.inf. If Windows is hiding file extensions, you may only see the name CNQ4807. It is the same file.

Step 4. Manually install the scanner driver using CNQ4807.inf
If Windows says “Device not recognized”, first connect the scanner directly to a USB port on the computer and open Device Manager. Find the unknown USB device or CanoScan LiDE 200 with an error icon. Right-click it and select Update driver. Then select the option to browse for drivers on your computer and specify the path to CNQ4807.inf. Confirm the installation.
After that, Windows should detect the scanner as a Canon device. If the driver installs but scanning still does not work, disconnect the USB cable, reconnect it, and restart the computer.
This video shows how to manually install a driver using “Have Disk…”
Step 5. Install MP Navigator EX
After the driver is installed and Windows detects the scanner, install MP Navigator EX. This is an important step if you want standard scanning without using more advanced TWAIN applications. MP Navigator EX is not a driver. It is the user application for starting scans, saving files, creating PDFs, sending by e-mail, and performing other tasks.
If you install MP Navigator EX before the ScanGear driver is working properly, the application may show a “No driver” message. For the LiDE 200, the correct order is: first the driver, then connect the scanner, and only after that install MP Navigator EX.
Step 6. First check after installation
After installation, first check whether Windows can see the scanner itself. Then open MP Navigator EX and try a simple scan of a document or photo. If scanning from MP Navigator EX works, the driver and the application are installed correctly.
After that, you can move on to the buttons on the scanner.
What you need to know about the scanner buttons
The CanoScan LiDE 200 has COPY, PDF, SCAN, and E-MAIL buttons. The SCAN button automatically detects the document type and scans it using suitable settings, while the PDF button saves the image as a PDF. These functions rely on Canon software, primarily MP Navigator EX and the scanner event settings.
If the SCAN button does not work, but scanning from the application itself works, that usually means the problem is not with the scanner driver. It usually means the application assigned to the buttons is not configured correctly, or Windows did not link the button event to MP Navigator EX.
Why the “Device not recognized” error appears
For the LiDE 200, this most often happens in four situations. First, the scanner was connected before the driver was installed. Second, the wrong or a faulty USB cable is being used. Third, the driver did not install fully and has to be installed manually through the INF file. Fourth, Windows remembered a failed device setup, and it must be removed from Device Manager before reinstalling.
Why MP Navigator EX says “No driver”
This error usually means that ScanGear is not installed, was installed incorrectly, or the scanner is not detected by the system. First, check Device Manager, not the application itself. If there is an unknown device or an error next to LiDE 200, fix the driver first. Only after that should you reinstall MP Navigator EX.
Sometimes a full reset cycle helps: remove LiDE 200 from Device Manager, disconnect USB, restart the computer, reinstall the Canon driver, restart again, unlock the scanner on the bottom, connect it, and only then install MP Navigator EX.
Additional problems that can happen after installation
In practice, this usually means the following. If the LiDE 200 appears to be installed, but scanning freezes, does not start, or works only intermittently, check whether another scanner or multifunction printer with a scanner is connected to the computer, whether the computer entered sleep mode, and whether there is enough free space on the system drive.
Installation on Windows 8.1, Windows 8, and Windows 7
On Windows 8.1, Windows 8, and Windows 7, installation usually goes more smoothly. However, the order should stay the same. First run the Canon driver as administrator. Do not connect the scanner until the installation is complete. After the installation and restart, unlock the scanner on the bottom, connect it by USB, and let the system detect it. Then, if you want convenient scanning through the Canon interface, install MP Navigator EX.
Short conclusion
If you have a Canon CanoScan LiDE 200 on Windows 10 or Windows 11 and the system says “Device not recognized” while MP Navigator EX says “No driver”, do not start with MP Navigator EX. Start with the ScanGear driver. The most reliable order is: remove old failed installations, do not connect the scanner in advance, install the Canon driver, restart the computer, release the transport lock on the bottom, connect the scanner, manually install the driver through CNQ4807.inf if needed, and only after that install MP Navigator EX. In most cases, that is enough to get the LiDE 200 working normally again.
Thank you. The driver is installed and works well.